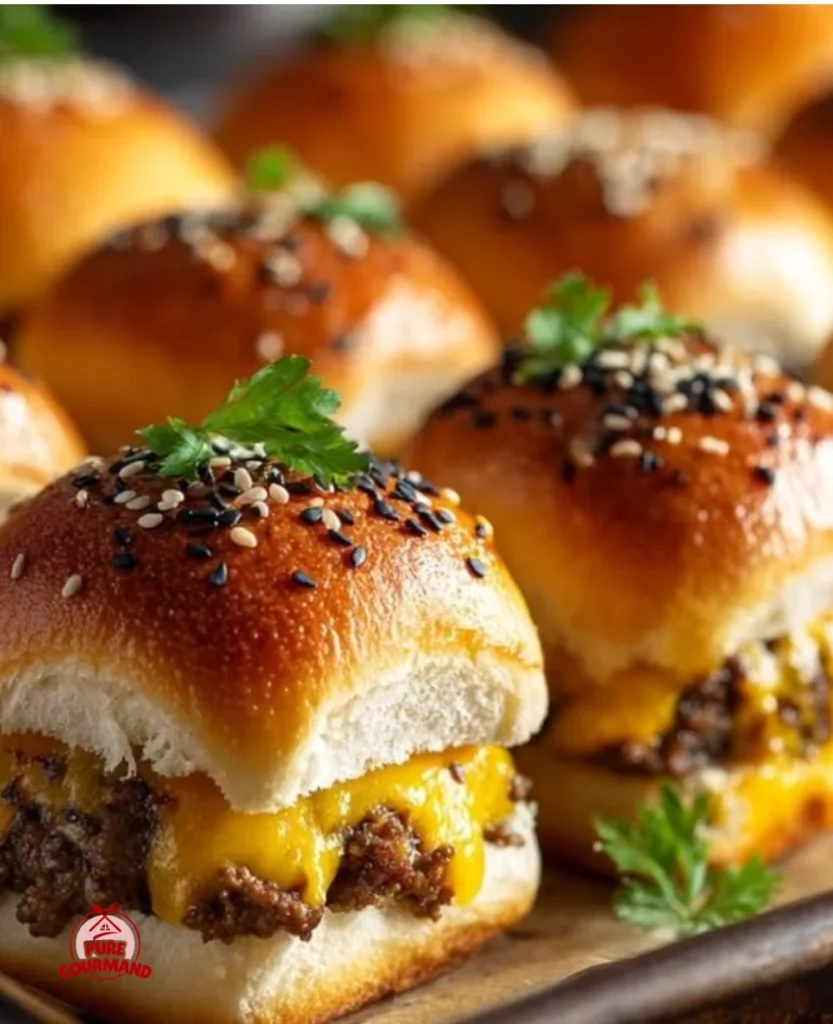
As I reminisce about summer gatherings filled with laughter and good cheer, my mind drifts to a magical little dish that has become a staple at every party: Hawaiian Roll Cheeseburger Sliders. These delightful bites are more than just comfort food; they evoke memories of backyard barbecues and festive family reunions, where everyone gathers not just to eat, but to bond over deliciousness. The sweet, soft Hawaiian rolls cradle a savory beef mixture, topped with melted cheddar cheese and tangy pickles, creating a symphony of flavors that dance on your palate. They are irresistibly easy to pop in your mouth, prompting a second, third, or even fourth helping, as those buzz-filled conversations flow late into the evening.
Recipe Timing
- Prep Duration: 10 minutes
- Active Cooking: 20 minutes
- Total Duration: 30 minutes
- Portion Size: Serves 12
- Complexity: Simple
Nutritional Recipe
- Calories per portion: 250 kcal
- Protein: 14 g
- Carbs: 18 g
- Fats: 15 g
- Fiber: 0.5 g
- Sugars: 3 g
- Sodium: 650 mg
Why You’ll Love This Hawaiian Roll Cheeseburger Sliders: The Ultimate Party Food
These sliders are the ultimate crowd-pleaser, merging two beloved classics—cheeseburgers and sweet rolls—into one delectable dish. They’re perfect for any occasion, whether you’re hosting a game day, a casual weekend gathering, or even a fun family movie night. With minimal prep and mess, you get a hearty and satisfying snack that not only delights but invites everyone to dive in. Best of all, they can be customized with your favorite toppings or sauces, making them a versatile choice for any palate.
The Complete Cooking Journey
Let’s embark on this culinary adventure together as we transform simple ingredients into an unforgettable dish that your friends and family will rave about. Ready? Grab your spatula, and let’s get cooking!
Ingredients:
- 1 lb lean ground beef (85/15 recommended)
- 1/2 cup yellow onion (finely diced)
- 1 tbsp Worcestershire sauce
- 1/2 tsp garlic powder
- 1/2 tsp salt
- 1/4 tsp black pepper
- 12 count Hawaiian sweet rolls
- 8 slices cheddar cheese
- 1/4 cup dill pickle slices
- 1/4 cup salted butter (melted)
- 1 tbsp Dijon mustard
- 1 tsp poppy seeds
- 1/2 tsp onion powder
Method:
Step 1: Preheat the Oven
Preheat your oven to 350°F (175°C), setting the stage for the warm, cheesy goodness that’s about to emerge.
Step 2: Sauté the Beef and Onions
In a large skillet over medium-high heat, cook the ground beef and finely diced onion until the beef is browned. The savory aroma will fill your kitchen, a clear indication of the flavor explosion ahead. Drain any excess grease.
Step 3: Add the Flavor
Stir in the Worcestershire sauce, garlic powder, salt, and pepper. Allow these rich flavors to meld together for a minute longer, enhancing the beef mixture.
Step 4: Prepare the Hawaiian Rolls
Without separating, slice the slab of Hawaiian rolls in half horizontally. The soft sweet rolls create the perfect cushion for our delicious fillings.
Step 5: Layer the Bottom Half
Place the bottom half of the rolls into a 9×13 inch baking dish. This is where the magic truly begins as you evenly layer the beef mixture over the rolls.
Step 6: Assemble the Bounty
Add a generous layer of dill pickle slices followed by the cheddar cheese slices, completing the hearty stack of flavors.
Step 7: Cap It Off
Place the top half of the rolls back on, sealing in all those delicious ingredients and preparing for the buttery topping.
Step 8: Create the Butter Mix
In a small bowl, whisk together the melted butter, Dijon mustard, poppy seeds, and onion powder. This mixture will add a delightful crunch and depth of flavor to the sliders.
Step 9: Brush the Rolls
Evenly brush the melted butter mixture over the tops of the rolls. Each roll will absorb this deliciousness, tantalizing everyone’s taste buds.
Step 10: Bake to Perfection
Cover the dish with foil and bake in the oven for 10-15 minutes, waiting for that glorious moment when the cheese is perfectly melted. Remove the foil for the last 2-3 minutes to toast the tops, creating a golden finish.
Step 11: Rest and Savor
Once out of the oven, let the sliders rest briefly before serving. This allows the flavors to settle and gives you the perfect time to gather your guests.
Serving Suggestions & Pairings
Serve these sliders hot out of the oven with crunchy potato chips, a refreshing coleslaw, or even a batch of crispy sweet potato fries. Pair them with a chilled soda or a fruity mocktail for the ultimate party experience.
Storage & Leftovers Guide
If by some miracle you have leftovers, keep them in an airtight container in the fridge for up to 3 days. Reheat in the oven or microwave, ensuring they are warmed all the way through before serving again.
Kitchen Wisdom & Success Tips
- Don’t skimp on the butter-brushing step; it elevates the rolls to new heights of flavor.
- Feel free to throw in some cooked bacon bits for a smoky twist!
- If you want an extra kick, add jalapeños or your favorite hot sauce to the meat mixture.
Flavor Variations & Adaptations
Here are a few delightful variations to try:
- Veggie Sliders: Swap the beef for black beans and lentils for a tasty vegetarian alternative.
- Spicy Sliders: Mix in some diced jalapeños or sriracha for those who love a heat kick!
- *Cheesy Spin: Switch the cheddar for pepper jack or even a blend of your favorite cheeses for added flair.
Reader Questions & Solutions
-
Can I use ground turkey instead of beef?
Absolutely! Ground turkey will work beautifully; just be mindful it may be less flavorful, so consider seasoning it a bit more. -
Can I make these in advance?
Yes! Prepare everything up to the baking step, cover it, and pop it in the fridge. Bake right before guest arrival. -
What if I don’t have Worcestershire sauce?
Soy sauce can be a great substitute, or try blending soy with a touch of vinegar for depth. -
Can I freeze the sliders?
Yes, assemble but don’t bake them. Wrap tightly and freeze for up to a month. Thaw before baking. -
How can I make these gluten-free?
Use gluten-free rolls available in stores, and check for gluten-free Worcestershire sauce.
Wrapping Up
These Hawaiian Roll Cheeseburger Sliders truly embody the spirit of joyful gatherings. A dish that makes cooking feel effortless while still bringing smiles to your loved ones’ faces is a win in my book. I encourage you to try this recipe at your next gathering. Gather your ingredients, follow the steps, and prepare to create memories infused with tantalizing flavors and joyful laughter. Enjoy every bite and embrace the warmth of sharing good food with even better company!